I often don’t like DIY projects for holiday decorations because they take a lot of time to make and might not look as good as store-bought products. However, I couldn’t find a large enough arch for my driveway, so building my own is the only way. Here is how I create 3 sturdy arches that stand roughly 10 feet tall and 14 feet wide.
Materials
- 2 pieces of 10-ft 1-1/2″ Schedule 40 PVC pipes (used as stakes) — $10 each
- 10 pieces of 10-ft 3/4″ Schedule 40 PVC pipes (used for the arch frames) — less than $7 each
- 4-Way 3/4″ PVC furniture-grade fittings – I purchased a 10-pack for about $14 from Amazon
- 3/4″ PVC Tee fittings – 4 pieces, less than $1 each
- Duct tape (used to secure connections)
- Garland and Christmas string lights for decoration
This combination of pipe sizes and connectors allows the arches to remain lightweight yet tall and flexible enough to form a smooth curve. I prefer using duct tape over PVC cement for joints since it provides enough hold for temporary seasonal use while making disassembly easier after the holidays.
Building the Stakes
Each arch needs a pair of ground stakes to support the curved PVC frame. To create them, take the two pieces of 1-1/2″ PVC pipes and cut them into 6 equal lengths for the three-arch setup. Since these larger pipes are thicker and more rigid, they work perfectly as sleeves that anchor into the ground.
Insert each stake into the soil on opposite sides of the driveway, spacing them about 14 feet apart. The depth can vary depending on your soil, but typically 12 inches gives enough stability to keep the arch upright even in wind.

Creating the Arch Frame
Each arch is formed using 3 pieces of 3/4″ pipes. I connect them together using the 4-way fittings and PVC tees. I also connect the 3 arches together to make them more stable. Make sure to secure each joint with duct tape to prevent rotation or slipping. Then, lift each end and insert them into the staked sleeves.
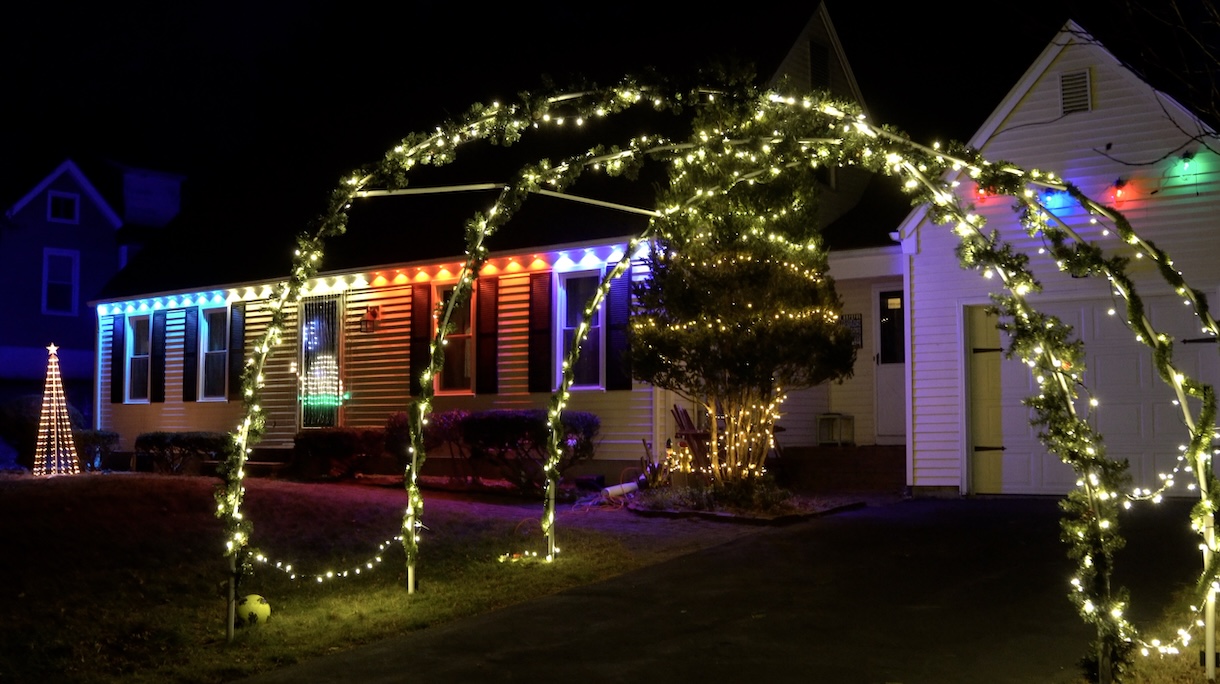
With the frames standing, you can start decorating by wrapping each arch with garland and securing it with zip ties. Then layer LED string lights over the garland. When done properly, the lights distribute evenly and create a glowing tunnel effect that looks incredible from the street.
Total Cost Breakdown
Here’s the total cost for the project:
- 1-1/2″ PVC stakes: 2 × $10 = $20
- 3/4″ PVC frame pipes: 10 × $7 (or slightly less) ≈ $70
- 4-way fittings: 10-pack = $14
- 3/4″ PVC tees: 4 × $1 = $4
- Duct tape: $5–$7 depending on brand
- Garland and lights: cost varies, but typically $20–$40 per arch
The approximate total for the structural materials is $110. If adding garland and lights for all three arches, expect another $50–$100. I really like this DIY project because it is affordable, sturdy, reusable, and looks impressive.