If you’re using macOS, you might find its built-in screenshot capture tool extremely useful. You can press Command (⌘)-Shift-3 to take a screenshot of your whole screen or Command (⌘)-Shift-4 to take a screenshot of part of your screen.
By default, macOS will save your screenshots as PNG files on your desktop. An advantage of PNG is the better image quality, however, you won’t be able to recognize the difference most of the time, especially when you use the screenshots on the Web. Meanwhile, the PNG files are a lot bigger in size. For instance, I took a screenshot of my desktop, the JPEG file size was just 800KB while the PNG file took more than 4MB.
Read also: Learning Your Way Around Mac Keyboard
Of course, you can open the PNG file and export it to a JPEG file later but it could cause heavier workload when you have to deal with the screenshots regularly. So, the tutorial will show you how to change the image format of your screenshots from PNG to JPEG, or GIF, PDF, TIFF. Just follow the steps below.
How to Change Screenshot File Format on your Mac
1. Open Terminal. You can find it on your Dock, in Applications or in Launchpad
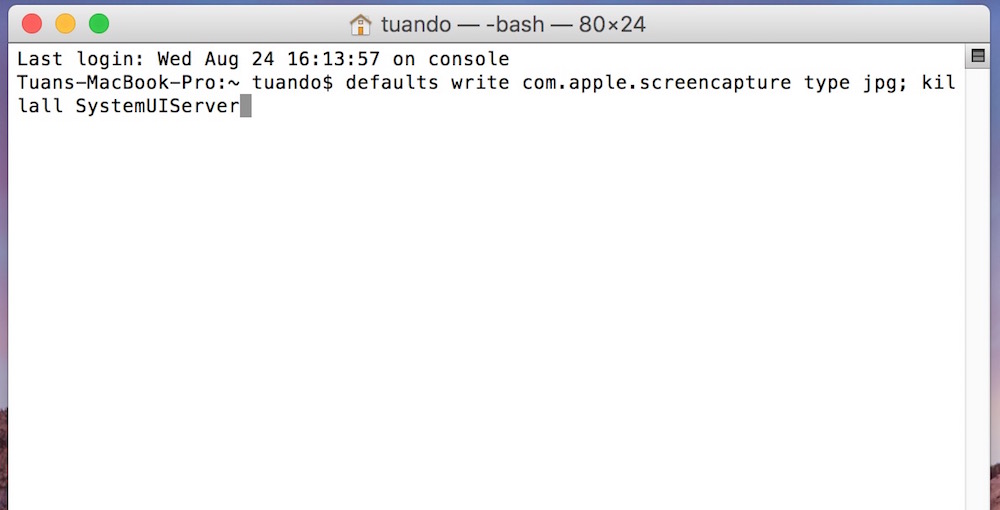
2. Type the line below into your Terminal window, then press Return key
defaults write com.apple.screencapture type jpg; killall SystemUIServer
That command will change the screenshot format to JPG. If you want to change it to other formats, just replace JPG with GIF, PDF, PNG or TIFF.
As I mostly use the screenshots for my blog posts, this tip saves me a lot of time and disk space as well. After that, I also use some other tools like ImageOptim to compress those pictures and make the size even smaller.
In case you want to save the screenshots somewhere else to avoid a cluttered desktop, you can use the following command:
defaults write com.apple.screencapture location ~/Documents/Screenshots; killall SystemUIServer
That’s all for today. Hopefully, the tip will be helpful for you guys.


Paul Barakis says
This is an amazing tip. I could definitely use this on my mac. Thanks!
j says
That’s not working for me. I’m on 10.8.5
What I like to do is take the type of screen grab that copies what I select in memory so I can paste it directly into an email message. I’ve found that the mail I send to android users won’t see a .tiff file in their message so I want to send the, a jpg which they can see. Your technique does work to create a ,jpg file but it’s a few extra steps to open the folder it goes to and drop the .jpg file into the mail message. I want to paste the selection from memory directly to the email instead of creating a file.
So is there any way to tell the system to copy the selection as a .jpg instead of a .tiff?
Thx
Tuan Do says
Unfortunately, you can’t change the file format of the clipboard, it’s set to .tiff.
There are some 3rd-party apps that might work but I won’t recommend them. So, drag&drop the .jpg file is the easiest way.
jpmist says
Was afraid that’d be the case, thanks for your reply!
jap wal says
5 years later on Catalina 10.15.7 and this tip still works like a beauty for me. As I take screenshots of entire books and then process them through CZUR software that only reads jpgs, to transfer them into searchable PDFs, this is a great help!