• Skip to primary navigation
  • Skip to main content
  • Skip to footer
  • Home
  • Advertise With Us
  • Contact
  • Cookie Policy
    • Privacy statement (CA)
    • Cookie policy (CA)
    • Privacy statement (UK)
    • Cookie policy (UK)
    • Privacy statement (US)
    • Cookie Policy (US)
    • Privacy statement (EU)
    • Cookie policy (EU)
    • Disclaimer

TechWalls

Technology News | Gadget Reviews | Tutorials

  • Reviews
  • Tech Guide
  • Home Improvement
  • Gadget & Apps
  • News

How to Install and Download JDK and Setup Java Home Directory with Environment Variables

Updated on Jan 22, 2014 by Guest Authors

Those who want to learn Java programming first they have to learn how to install Java in their system. Java installation is easy to learn but some of them are little bit confused with setup path for Java directory with Environment Variables.

First you need JDK. You can easily download from this given link this will makes you easy and save your time.

  • Jdk

Step 1:

When your download is completed then click on jdk software. After clicking on that this will star the setup wizard. Leave the options as default and click on next again. This will install jdk on your system after that new window will appear asking to install jre. Click on next button again, and then click on finish. To check if java is installed correctly Go to location where is your java installed for example C:\program files\Java and you would see folders of java as jdk1.7.0_01 and jre7.

Step 2:

After installation java on your system. Now you will set up the jdk home path directory in Environment Variable. For setup Environment Variable you have to follow some given steps. These steps are:

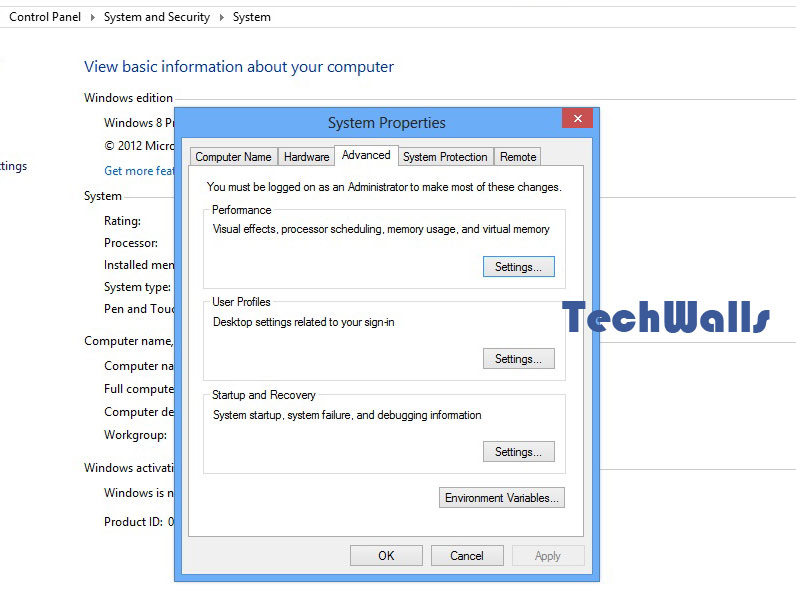
  • Go to Windows -> Start -> Computer or you will also go to right click on computer icon and select properties.
  • In control panel click on “Advanced System Setting” then click on Environment Variables as shown in figure below.

java-home-jdk-1

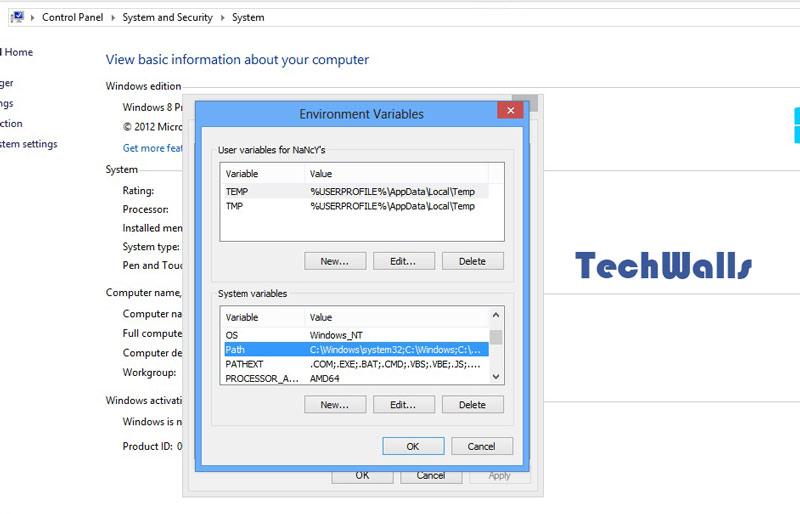
  • In Environment Variable box select path under System Variables and click on that and click on edit button.

java-home-jdk-2

  • When you edit the path go to end of the string put a semicolon (;) at the end and copy and paste the path of your jdk home directory (for example its c:\Program files\Java\jdk1.7.0_01\bin).
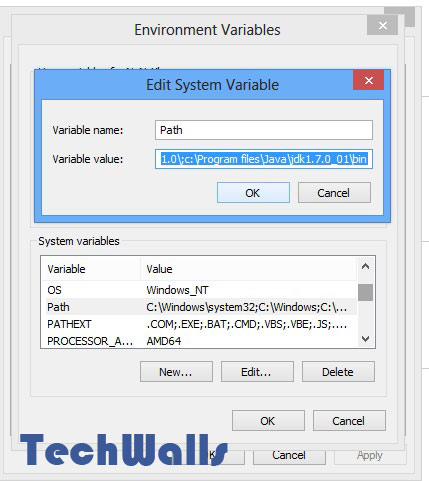
java-home-jdk-3

  • Click ok and finish

Step 3:

  • To test the Java as home directory go to Window -> Start -> Run open cmd and click ok.
  • In command prompt type java and press enter then you should see java installed on your system.

Now java is successfully installed on your system and setup java home directory also.

Hopefully this information is useful for you

Thank you

Disclosure: We might earn commission from qualifying purchases. The commission help keep the rest of my content free, so thank you!

Footer

Review of the Waterpik Evolution and Nano Water Flosser Combo Pack

Transparent Shaving: The yoose ICE Electric Shaver Review

INKBIRD IBS-TH5 Review – Smart Thermo Hygrometer with E-Ink Display

LISEN MagSafe CD Phone Holder for Car Review

Follow TechWalls

YoutubeFacebookTwitterInstagram

Recent Posts

  • Review of the Waterpik Evolution and Nano Water Flosser Combo Pack
  • Transparent Shaving: The yoose ICE Electric Shaver Review
  • The Hidden Cost of Cryptocurrency: Bitcoin’s Energy and Water Footprint
  • Free Places To Sleep Inside Hong Kong Airport During Long Transits

Copyright © 2023 · All Rights Reserved

Manage Cookie Consent
We use technologies like cookies to store and/or access device information. We do this to improve browsing experience and to show personalized ads. Consenting to these technologies will allow us to process data such as browsing behavior or unique IDs on this site. Not consenting or withdrawing consent, may adversely affect certain features and functions.
Functional cookies Always active
The technical storage or access is strictly necessary for the legitimate purpose of enabling the use of a specific service explicitly requested by the subscriber or user, or for the sole purpose of carrying out the transmission of a communication over an electronic communications network.
Preferences
The technical storage or access is necessary for the legitimate purpose of storing preferences that are not requested by the subscriber or user.
Statistics
The technical storage or access that is used exclusively for statistical purposes. The technical storage or access that is used exclusively for anonymous statistical purposes. Without a subpoena, voluntary compliance on the part of your Internet Service Provider, or additional records from a third party, information stored or retrieved for this purpose alone cannot usually be used to identify you.
Marketing
The technical storage or access is required to create user profiles to send advertising, or to track the user on a website or across several websites for similar marketing purposes.
Manage options Manage services Manage {vendor_count} vendors Read more about these purposes
View preferences
{title} {title} {title}