We all use our iPhones for just about everything. Some people just use their iPhones for basic stuff – calls, texts, maybe jotting down a quick note. Others push them harder, using them to sort out documents, tweak photos, or juggle work tasks while out and about. Either way, if you don’t pay attention to what piles up on your phone, things go downhill pretty fast.
Once the storage fills up, the phone can overheat, apps might crash out of nowhere, and you could lose whatever you were working on without warning. Sound familiar? Or maybe you want to avoid this headache altogether before it ever starts? Either way, you’re in the right place.
This guide shows you how to free up space on an iPhone and keep it running smoothly. No more random crashes, no more lag. Just a phone that works the way it should (every time).
Step 1: Check What Uses the Most Space on Your iPhone
Sure, you could start by wiping everything you see, like apps, screenshots, and random files. Just tap-delete your way through the chaos. But that’s not the smartest way to handle it. We don’t recommend deleting things blindly, instead, it makes more sense to focus on the data that actually eats up the most space.
Let’s say you’re into mobile games and have 80 of them installed on your iPhone. At the same time, your photo library holds about five shots from last weekend. Deleting those pictures won’t solve anything if the real storage hog sits in the game folder, right?
So, how do you figure out what takes up all that space? It’s simple. Your iPhone already has a built-in tool for this through Settings > General > iPhone Storage.
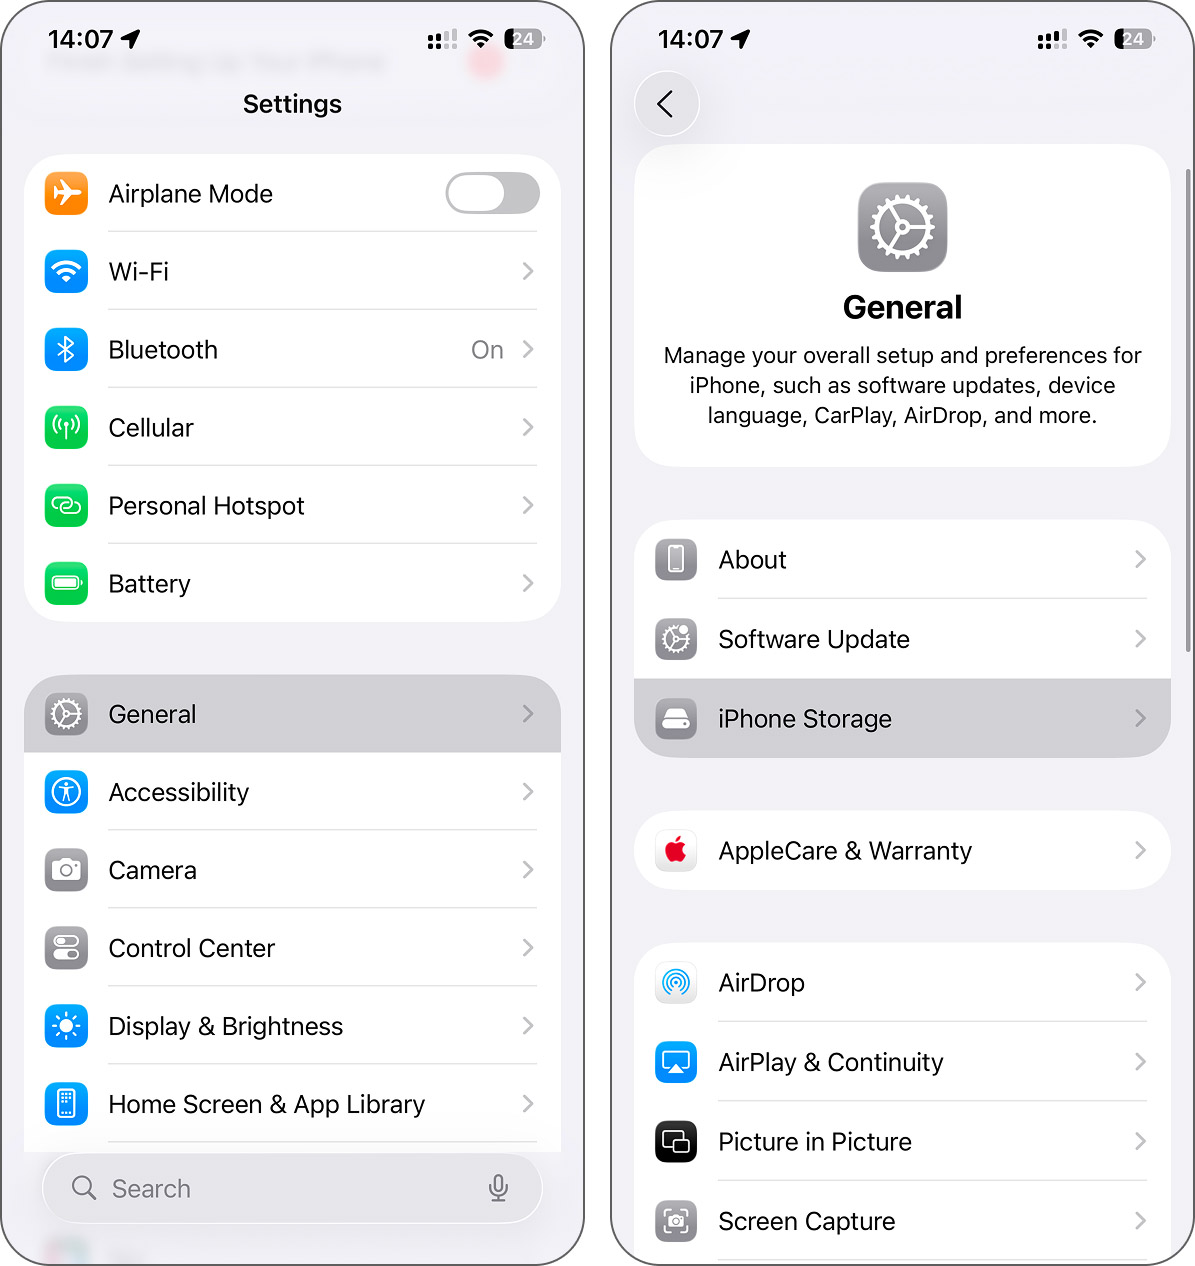
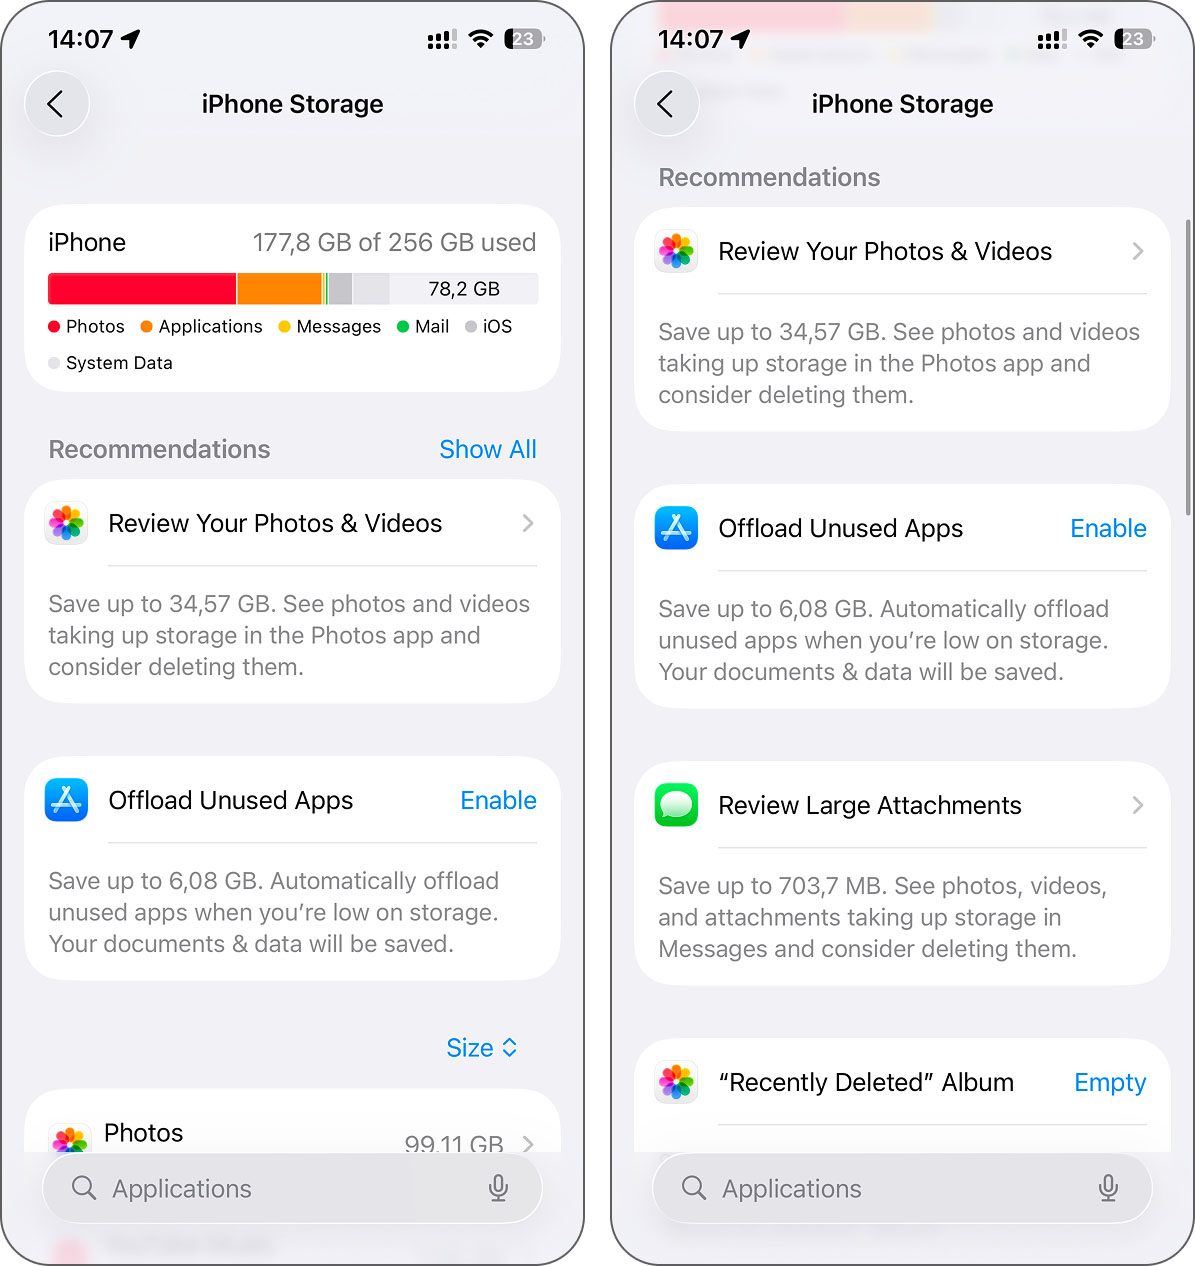
Once you open that section, you’ll see a color-coded graph right at the top. That bar shows what type of data fills up your device. Photos, apps, media, and system data – each has its own color. The longest section tells you where the problem starts.
Also, Apple tries to help here. You might see storage recommendations pop up, like clearing large attachments, offloading unused apps, or reviewing videos. In our case, the phone flagged photos and videos as the main problem area, and it was right. Each iPhone suggests different things based on how you use it. So if yours offers a tip, maybe give it a look, as it could save you time and space.
Step 2: Clean the Data Category That Takes Up the Most Space
Once you check your iPhone’s storage, you’ll see where the trouble begins. That’s your starting point. Sure, if you want the best result, you can clear out everything. But in most cases, the biggest difference comes when you deal with the largest category first.
Which category turns out to be the heaviest depends on how you use your phone. If you take lots of pictures, the Photos app probably sits at the top. If you install games, stream movies, or download files, apps, or media, they may take priority. So the path forward looks a little different for everyone.
Below, we’ll walk through the most common storage hogs – photos (including videos), applications, messengers, and mail. You’ll see how to clean each of them without messing up anything important.
Before we begin, a quick heads-up: you can’t clear out System or iOS data, as Apple doesn’t give access to those folders. Your iPhone handles them on its own, and that’s actually one more reason to clear up iPhone storage from time to time. The system still needs room to breathe for updates, backups, and background tasks. If there’s no space left, everything starts to lag.
So, if you’re ready to clear iPhone storage the smart way, let’s get started.
Step 2.1: How to Clean the Photos Category
As you probably noticed in the storage overview, the Photos category takes up the most space on our iPhone, close to 100GB. This includes everything inside the Photos app, like screenshots, camera roll shots, downloaded content, and videos. And honestly, it’s one of the easiest things to clean up, if you know where to look.
If you don’t care about your photos, you can just wipe the whole thing, every album, every clip, gone.
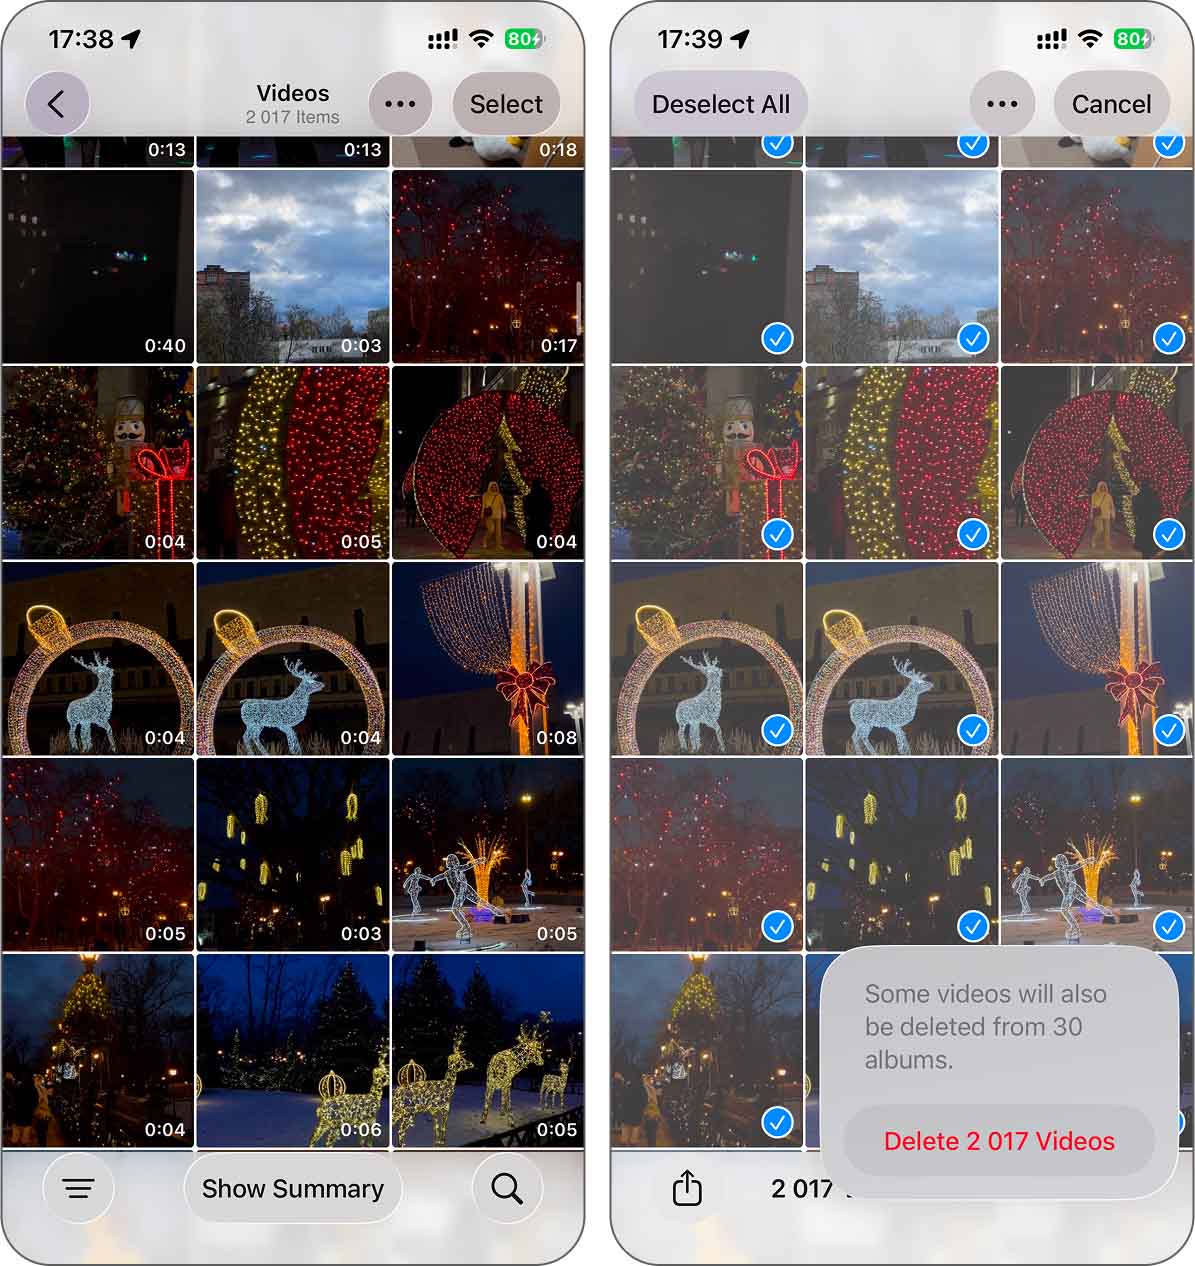
But for most people, that’s not an option. Photos hold memories, and videos show real moments. So instead of nuking everything, the better approach is to go through your media and get rid of what you no longer need. Now, doing this inside the Photos app feels like a full-time job. You scroll, you tap, you hesitate – then you get interrupted. And if you have an actual full-time job or a family to look after, this method won’t cut it. You need something faster.
This is where cleaning apps for iPhone come in. The App Store offers dozens, and while many of them promise to save space, we’d recommend using one that actually delivers. Let’s take Clever Cleaner: AI Cleanup App as an example. It’s free and handles all the major storage offenders in your Photos app. So, what exactly does it do? A lot, actually. It finds duplicate images, sorts similar photos, compresses Live Photos, locates large video files, and gives you a swipe-based mode that sorts photos by month for quick decisions. It’s way faster than digging through Photos yourself.
Let’s break down one of its most useful tools – Heavies. This one focuses on your largest media files, which usually means videos. If you remove just a few of these, you can instantly recover gigabytes of space.
- First, install Clever Cleaner from the App Store. Just make sure your iPhone runs iOS 16 or newer. After installing, open the app and allow it to access your Photos, otherwise, it won’t be able to do much.
- Once you’re in, look at the bottom menu. You’ll see several options like Similars, Heavies, Swipe, Screenshots, and Lives. For now, go with Heavies.
- The app will show you a list of videos, sorted from the largest down. You’ll see how much space each one takes and how long it is.
- Tap on any video to check it out. You can swipe between them or hit Select All if you’re ready to clean out the whole batch. As you mark files, the app adds up the space you’ll recover – it’s hard to miss, the number shows up right under the delete button.
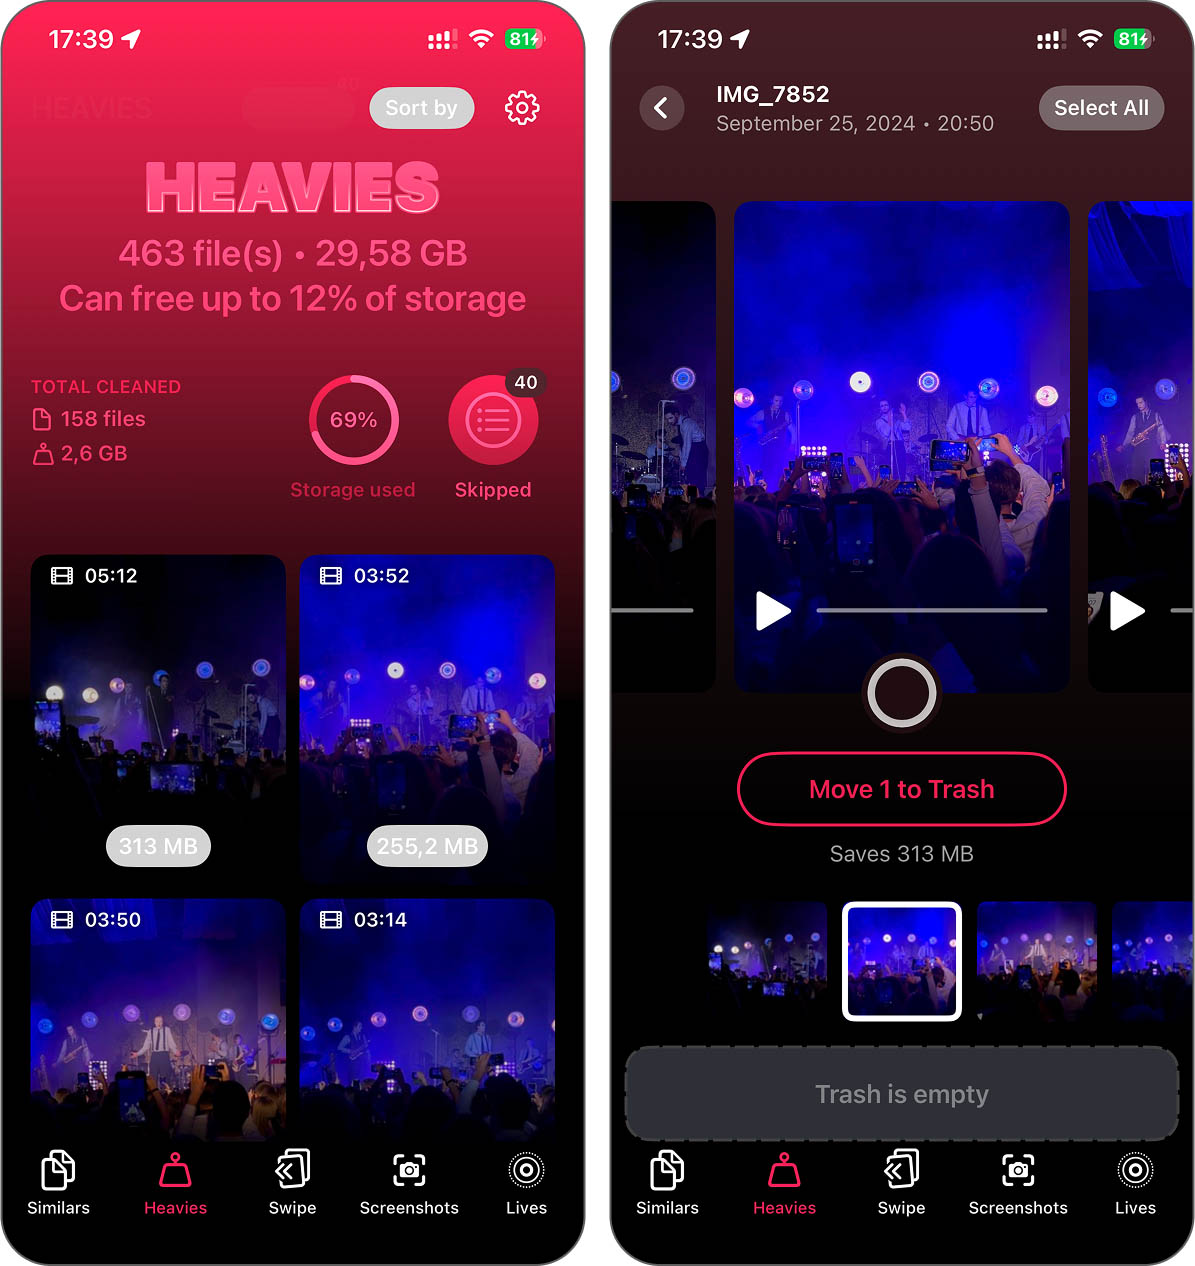
- Once you’re set, tap Move to Trash. After that, you’ll see Empty Trash at the bottom. Hit it when you’re sure about your choices.
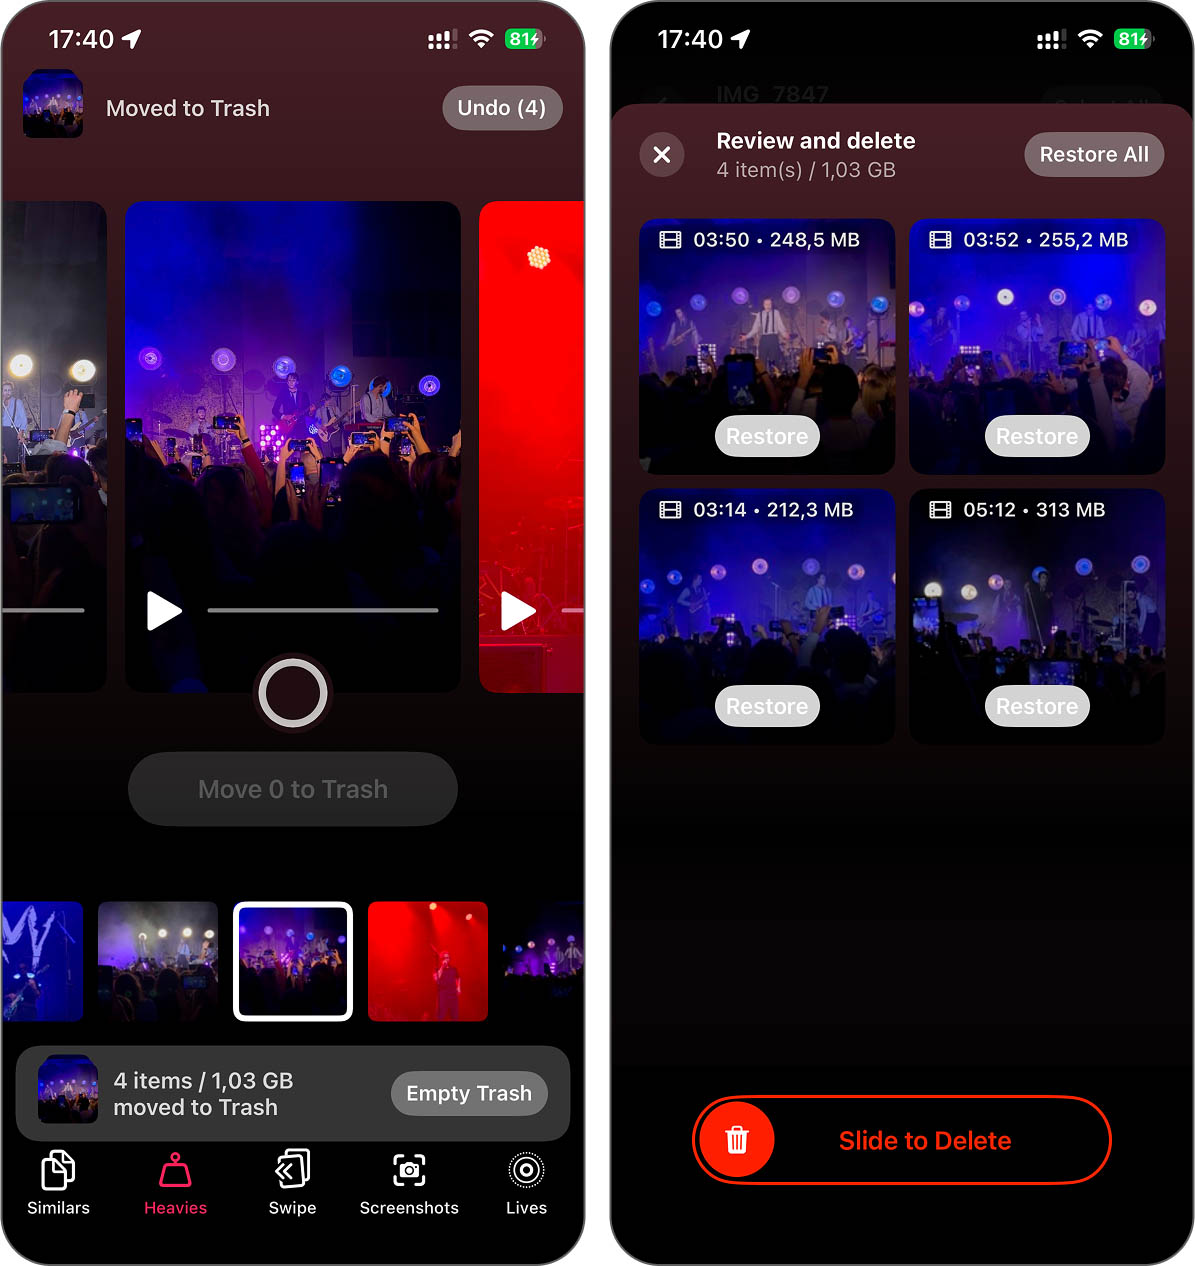
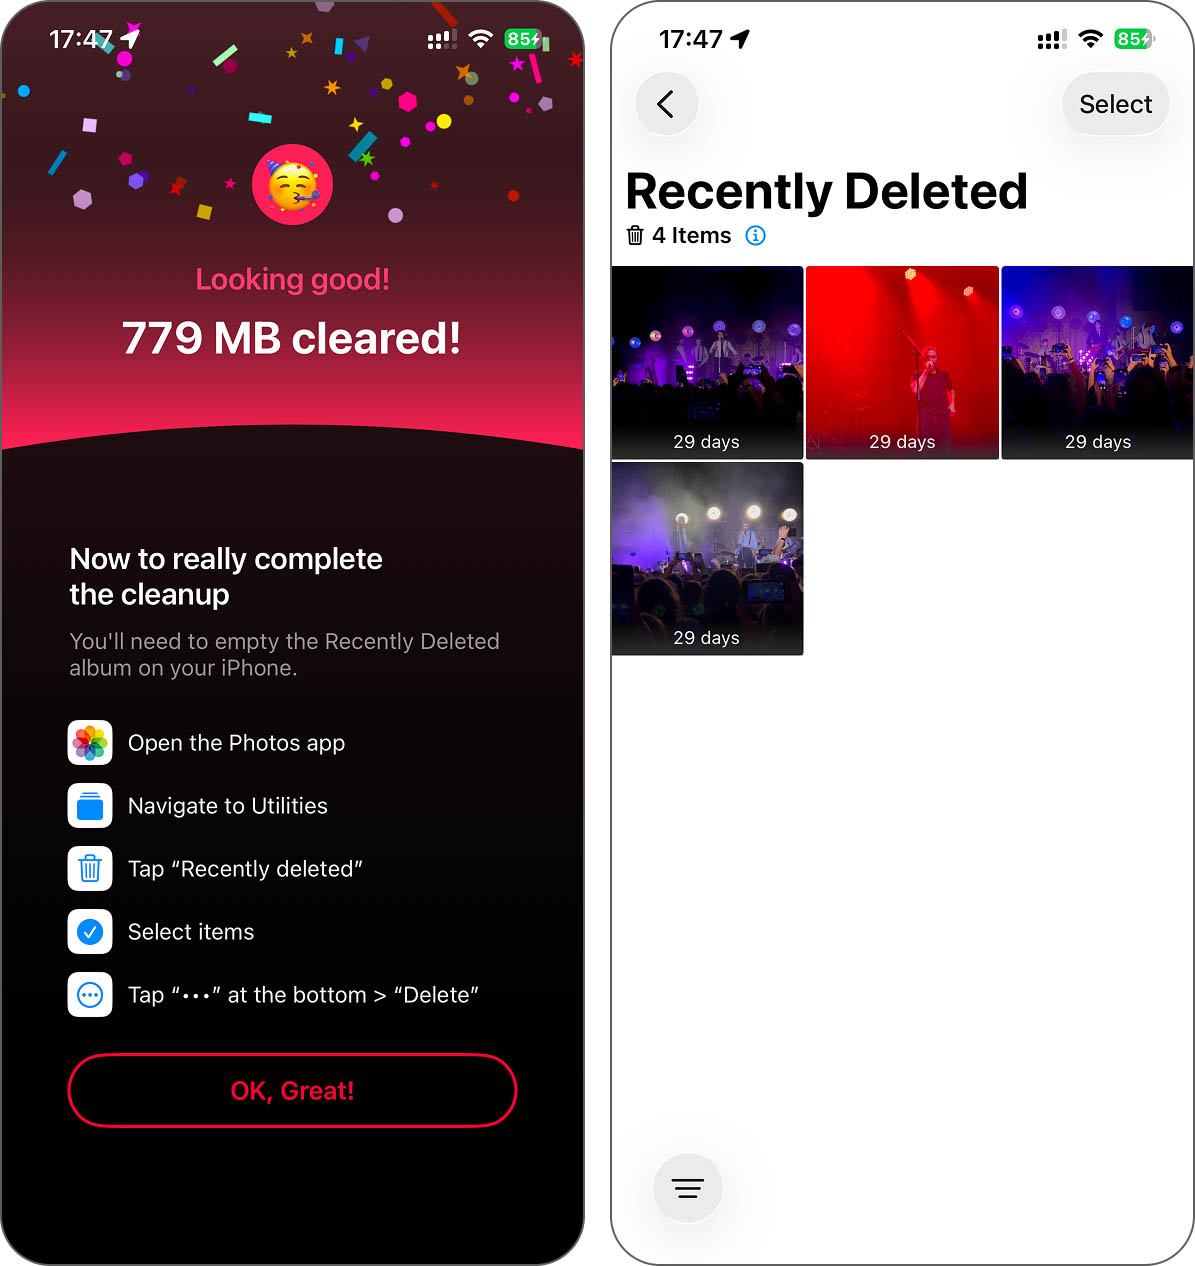
- Keep in mind, these videos don’t disappear right away, they go to the Recently Deleted album in your Photos. If you want the space back instantly, head there and delete them permanently. Otherwise, they’ll clear out on their own after about a month.
Once you clear out the heavy files, we suggest checking out the other features too, especially Similars. It sorts out photos that look almost the same and picks one version to keep. Usually, that’s the one that’s clearer or better lit. If the app’s choice doesn’t match what you’d pick, you can change it with a tap – nothing gets locked in. And once you figure out how one tool works, the others follow the same logic, so there’s no need to relearn anything.
Step 2.2: How to Clean the Applications Category
If the Applications category takes up the most space on your iPhone, you’re in for a bit more work than with Photos. This section covers not just the apps themselves, but also everything they save – documents, offline files, cached data, and even items stuck inside the Files app under On My iPhone. So here, you’ll need to go through a few different layers.
a) Files App
We suggest starting with the Files app. It’s the easiest part to deal with. While there aren’t any special tools for this, like there are for photos, Apple did include a few basic filters that help you see what clogs up your storage.
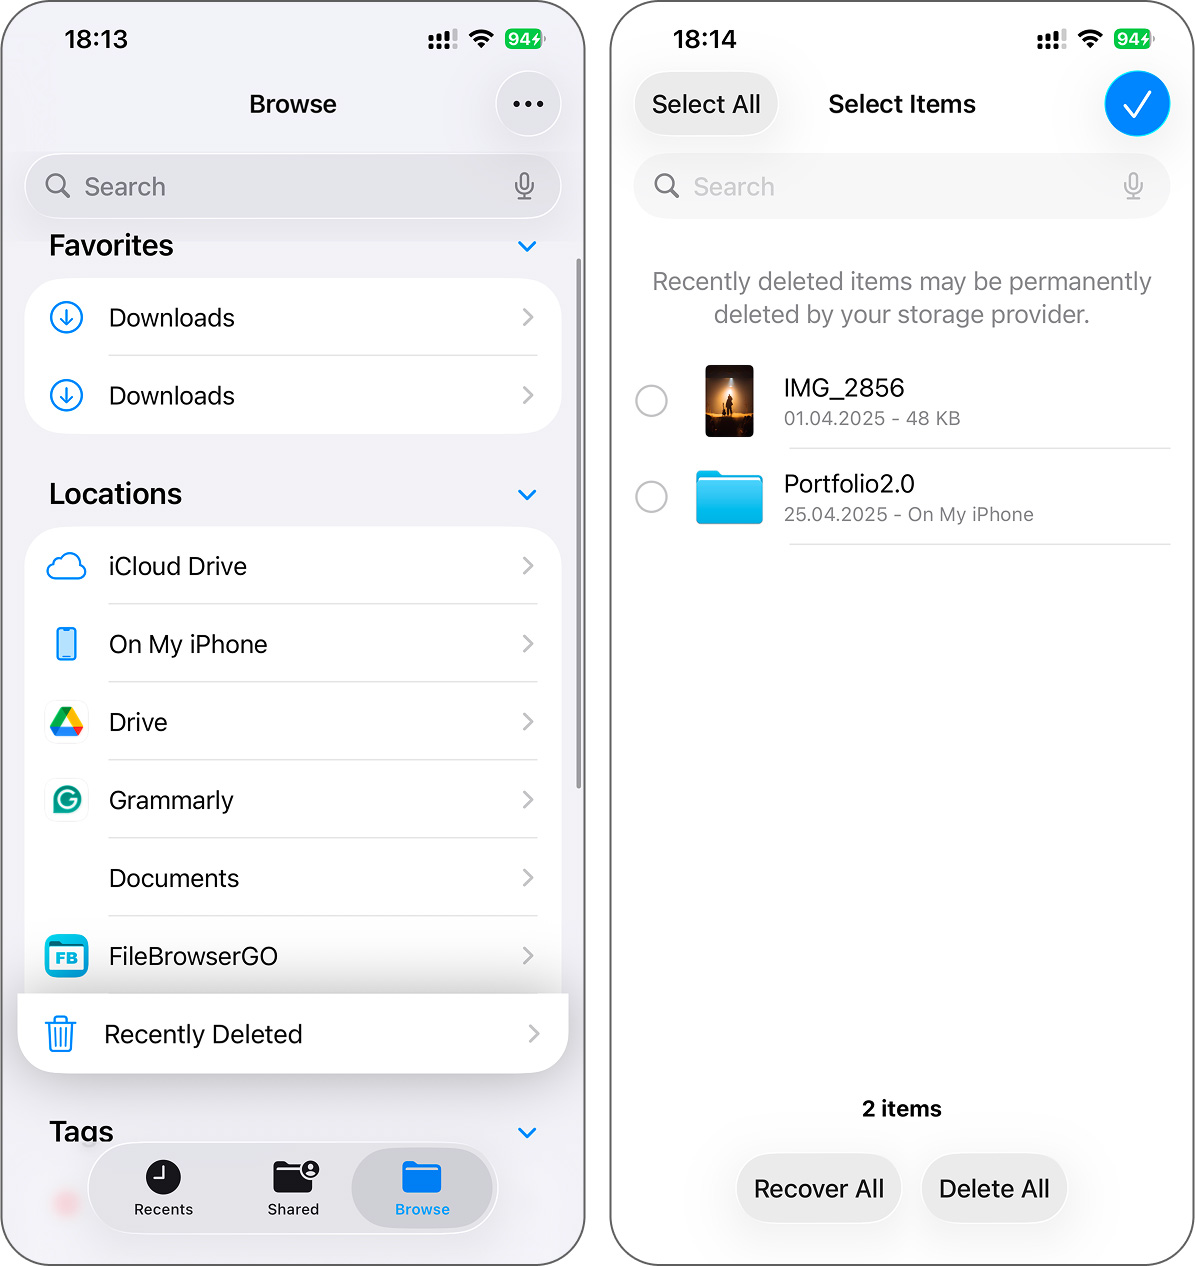
- Open the Files app, tap Browse at the bottom, and then select On My iPhone.
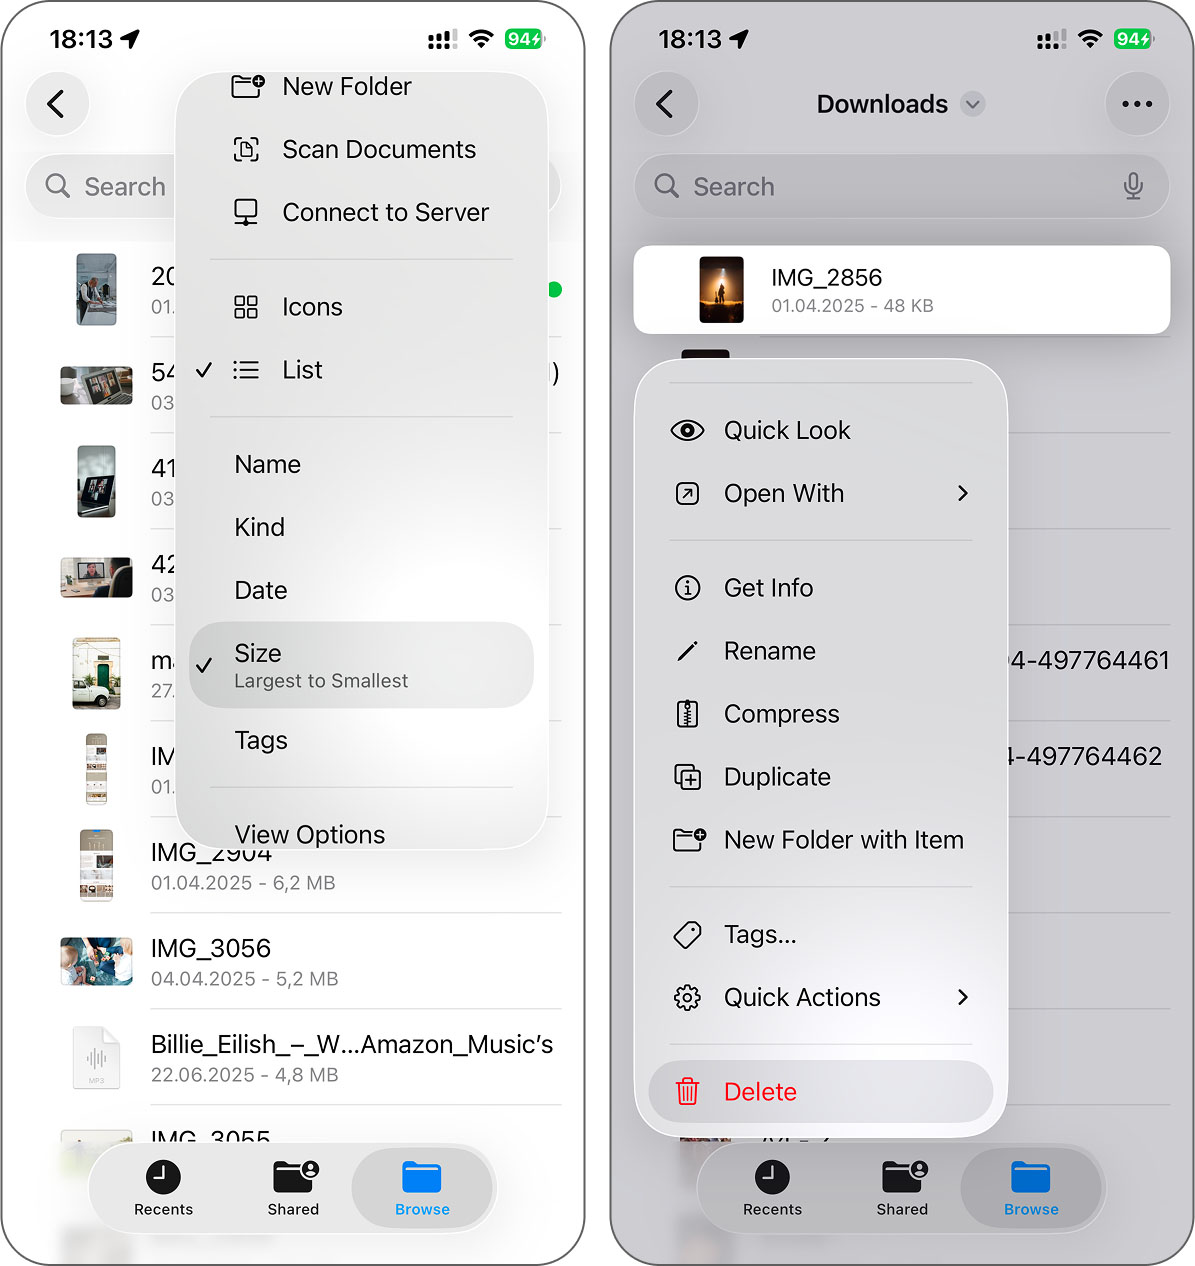
- Tap the filter icon (a small circle with three dots). We suggest choosing Size first, as it shows the largest files at the top, which are usually the biggest problem.
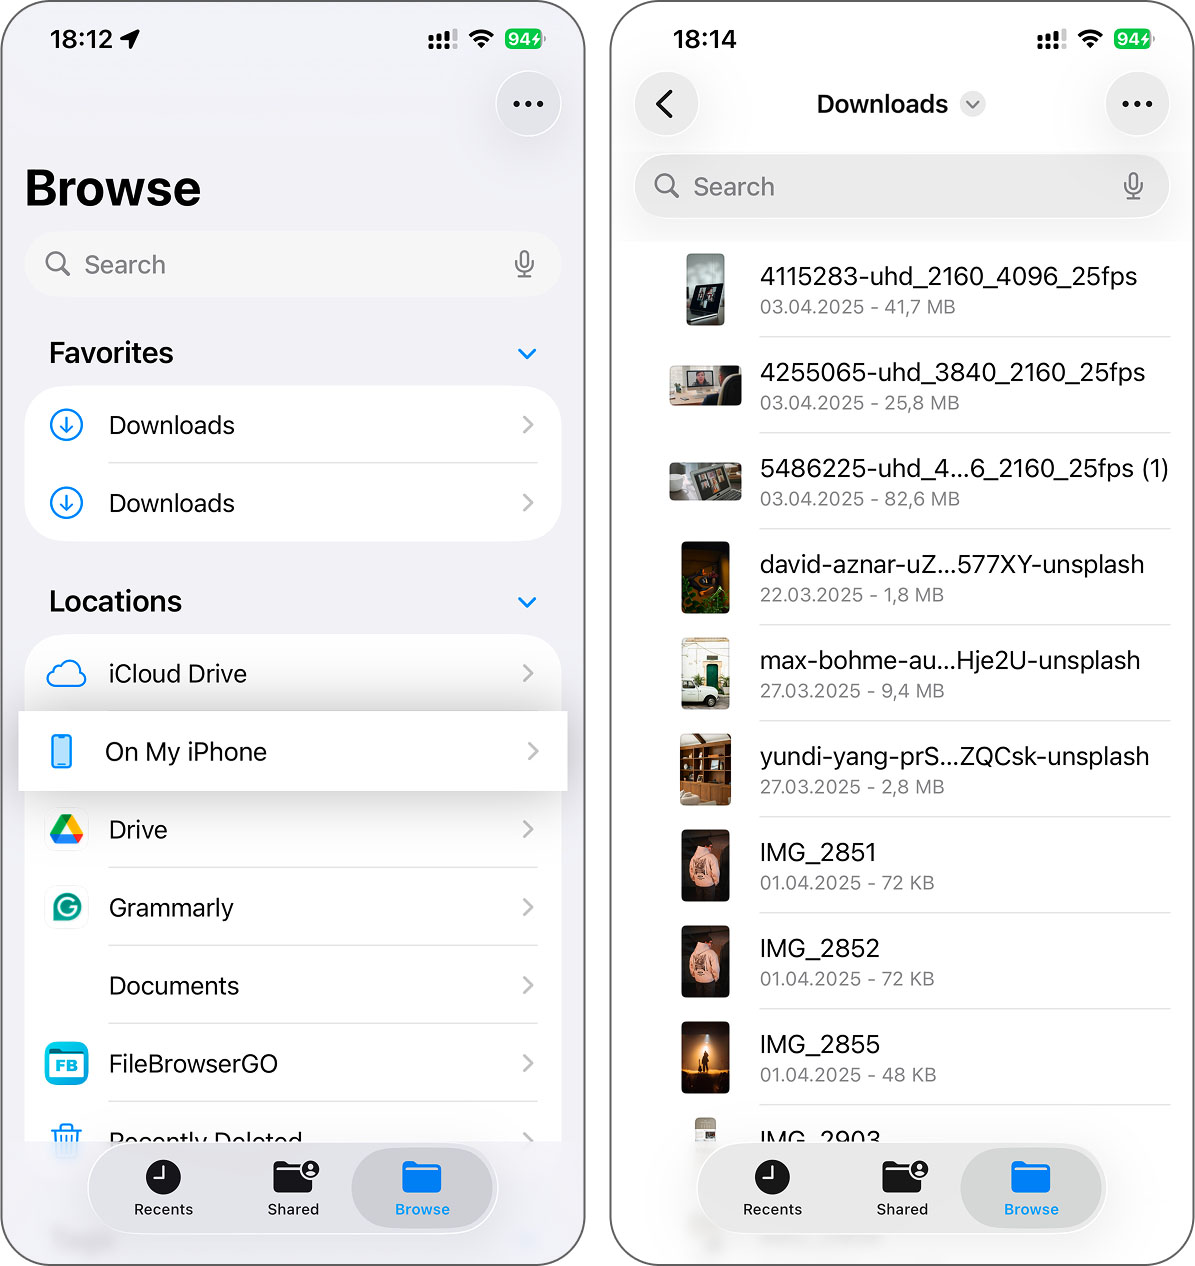
- Scroll through the list and take a look at what’s actually there. Tap on anything you know you don’t need (old PDFs, unzipped folders, leftover media files from apps) and hit Delete.
- Repeat the process, but this time sort by Date. You might catch outdated junk you forgot even existed.
- iOS moves all files you deleted to Recently Deleted, where they sit for up to 30 days. To free up space right now, go back into Files > Recently Deleted and manually clear that folder. Otherwise, the files stay there and continue to take up room until iOS removes them automatically.
b) Other Applications
Every app you install builds up extra data over time, like cached images, saved files, and background logs. You don’t see any of it, but it sits quietly and eats away at your storage. If you’re serious about freeing up space on your iPhone, this is something you shouldn’t ignore.
Some apps, like Telegram or TikTok, offer built-in settings to clear their cache. You can find these in the app’s internal settings menu, but let’s be honest, it takes time to open each one and dig through the menus. There’s a faster and more universal method: reinstall the app. That wipes all the junk and gives you a fresh start.
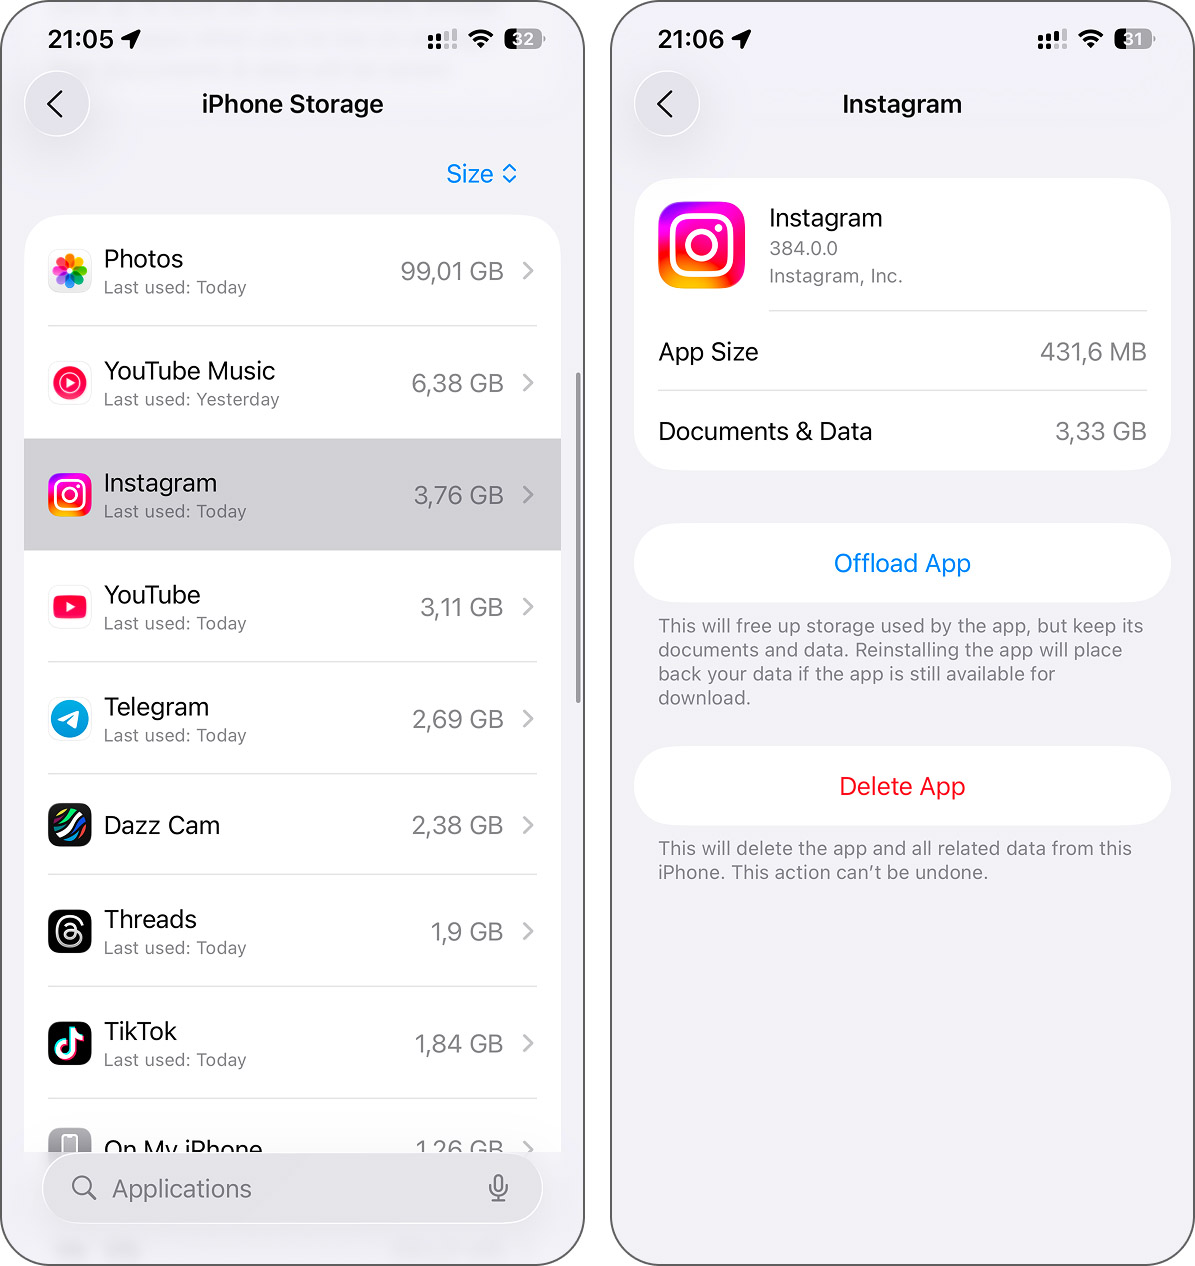
- Go into Settings, open General, and tap on iPhone Storage. Give it a moment, as your iPhone needs a bit of time to pull up all the apps and sort them by how much space they take.
- Scroll through the list until you find the app you want to deal with. Once you tap it, you’ll see two choices: Offload App and Delete App.
- If you don’t care about keeping anything from that app, go ahead and hit Delete App. That clears out both the app and everything tied to it.
- If you’re unsure, try using the Offload App instead, as it may have saved filters, settings, or game progress. That way, the app disappears, but all the data stays put.
- After either option, you can reinstall the app by downloading it again from the App Store. If you used offload, everything will return just like before.
If you scroll through your app list and spot something you haven’t used in months, or maybe even forgot you installed, you probably should remove it. Old utility tools, games you stopped playing, or apps you downloaded for one specific task and never opened again – all of these quietly eat space. Deleting them is one of the easiest ways to clear storage on iPhone without touching anything you still rely on.
Step 2.3: How to Clean the Messages Category
If, after checking your iPhone storage, you see that Messages takes up the most space, then honestly, we’re impressed. You must be incredibly social. Either that, or you’ve been in the same group chat since 2015 and no one ever deletes anything.
This category includes more than just the texts themselves. Every image, video, sticker, voice memo, or file ever shared through iMessage sits quietly in your storage. And those media files often take up more space than the conversations.
You probably already know how to delete entire chats. That’s easy. What’s less obvious is how to clear out attachments without scrolling through every single thread. Good news: there’s a faster way.
- Open Settings, scroll down, and tap on General.
- Go to iPhone Storage and wait for the list of apps to load.
- Tap on Messages.
- Under Documents, you’ll see sections like Photos, Videos, GIFs and Stickers.
- Tap into any of those categories. You’ll get a full list of all files sent or received through iMessage.
- Look through the list. Tap Edit in the top-right corner, select the items you no longer need, and then tap the Trash icon to remove them.
Keep in mind, these files disappear right away. There’s no safety net here, no Recently Deleted folder like in Photos or Files. Once you hit delete, it’s gone. So, before clearing anything, make sure you don’t see a vacation video or a saved voice memo from someone special.
Step 2.4: How to Clean the Mail Category
The last category we’ll go over is Mail. It works a bit like Messages – you’ve got the emails themselves, plus all the attachments that come with them. But unlike Message, there’s no built-in way to delete just the media. If you want to clear space, you’ll need to remove full emails.
You probably have a mountain of old messages you’ll never need again. We’re talking order confirmations, app signups, password change alerts, newsletters you forgot to unsubscribe from, and of course, spam. So if you’re willing to spend a few minutes, this category offers plenty of space to reclaim.
- Open the Mail app and head into your Inbox. Tap the three dots in the top corner and pick Select. Go through and tap the emails you no longer need. To speed things up, you can search by a word or sender (try something like “no-reply” or “subscription”) to pull up a bunch at once.
- Once you’ve picked what to remove, press and hold the Archive icon at the bottom. A small menu will pop up, choose Trash Selected Messages.
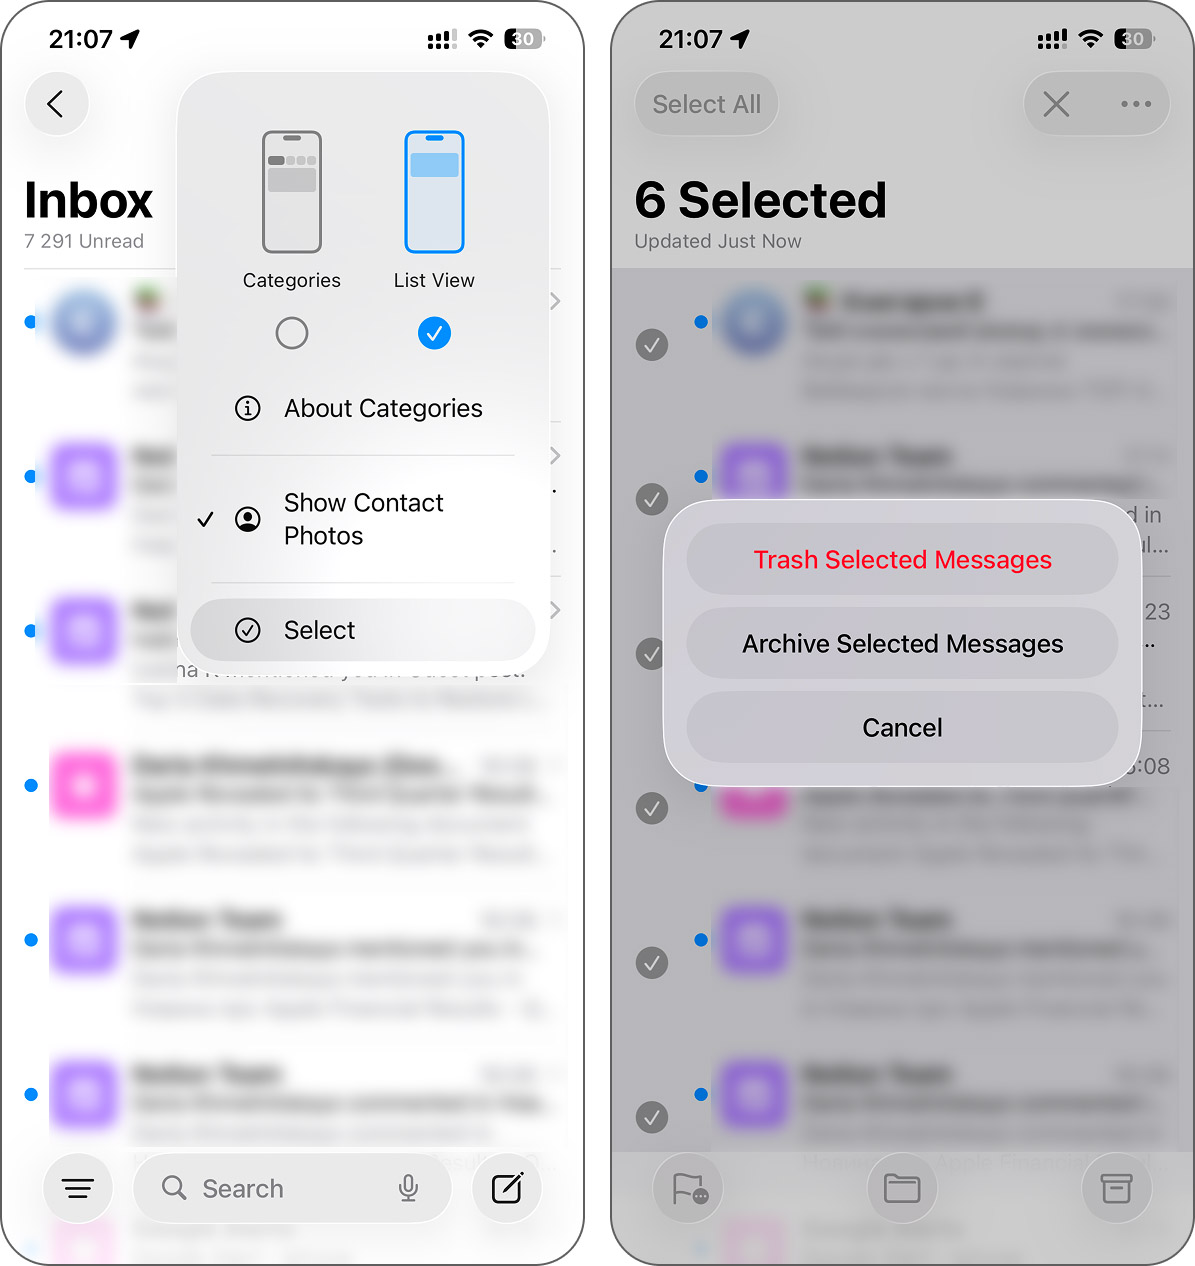
- Next, return to the main Mailboxes screen and scroll until you see the Trash folder. Open it, tap Select, then Select All, and hit the trash can icon. That clears out the emails permanently and frees up the space immediately.
If you use multiple accounts, you’ll need to repeat this for each inbox. It takes a bit of effort, but Mail can take up several gigabytes, especially if you’ve never cleared it before.
Final Thoughts
We’ve gone through the most common storage categories that tend to take up the most space. So, if your device slows down, overheats, or stops saving new files, and you’re trying to clear space on your iPhone, these are the first areas you should check.
The more you clean out, the more space you free up. That’s the simple rule. You don’t need to wait for your storage bar to turn red. It makes more sense to go through your files regularly, once a month, or right after you shoot a bunch of videos, download new games, or save too many random memes.
You don’t have to wipe everything. Just stay aware of what builds up. If you stay consistent, your iPhone will keep running smoothly (no lags, no crashes, no stress).