We wrote a guide to root Samsung Galaxy Note 3 recently. We also told you guys that if you root your device then Knox will get tripped and your phone’s warranty will be voided. We told you at that time to take your risk.
Knox is basically security software introduced by company which is currently present in Note 3 only so that Samsung get to know if your device is rooted and more. This helps then to save a lot of money. But now we do have good news for you all. Developers have found a way to root Note 3 without affecting Knox which is really good to know. So today we are going to give you all a detailed guide on how to root it.
Right Now this rooting guide is for Snapdragon 800 CPU variant only. Also another problem with this method right now is that it will completely clear up your device so you will have to install apps and everything whole again. So better back up your data and make sure that you take out micro SD card before rooting.

STEP 1: Downloads and Settings
Go to Security settings of your device and then turn off the “Reactivation Lock” because if you don’t do this then knox will come into action. Also make sure that you have all the drivers of phone installed. If you have Kies installed then you can skip this step otherwise download the drivers from here.
Download the new version of Odin and root zip.
Now you need to download AP and CSC file for your concerned version for that head over to this link and see the instruction for the same.
STEP 2: Download Mode
Now we need to take Galaxy Note 3 into download mode for that Switch off your device first then press Power button, Volume Down and Home Button all together. Then warning screen appears press volume up button to conform.
STEP 3: Connect to PC and Flash
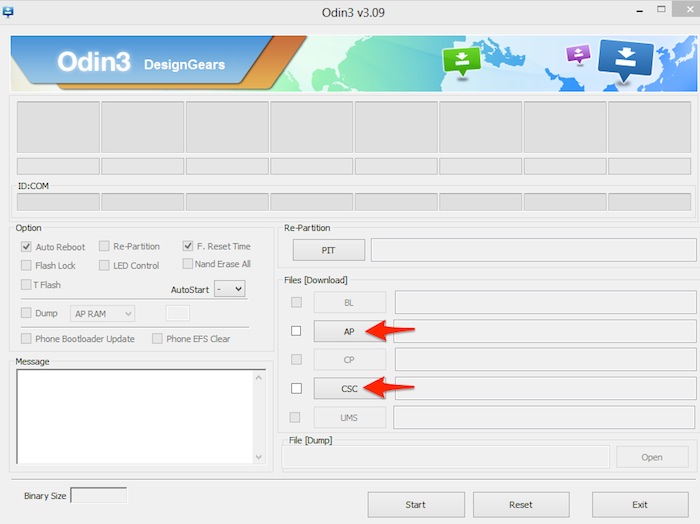
Now you need to connect Note 3 to Odin via USB cable. After Odin detects your device click on AP and CSC button and select the file you downloaded above for both. Then click on start button for flashing process to begin.
STEP 4: Transfer file
As the flashing process finishes your device will reboot. After reboot connect it to system again. Then copy the zip file which you downloaded above with Odin to the fixed storage of your device. Now again reboot your Note 3,
STEP 5: Delete the file
As your device reboots, Go to File Manager of the phone and find the file which you transferred in above step and delete it. Now again reboot your Note 3.
STEP 6: Final Step
And your phone is now rooted. So you have managed to root your device without affecting the Knox. So go ahead and install new apps and ROMs on your device. If you face any difficulty in rooting your device then just drop a comment below we will give our best to help you out.