• Skip to primary navigation
  • Skip to main content
  • Skip to footer
  • Home
  • Advertise With Us
  • Contact
  • Cookie Policy
    • Privacy statement (CA)
    • Cookie policy (CA)
    • Privacy statement (UK)
    • Cookie policy (UK)
    • Privacy statement (US)
    • Cookie Policy (US)
    • Privacy statement (EU)
    • Cookie policy (EU)
    • Disclaimer

TechWalls

Technology News | Gadget Reviews | Tutorials

  • Reviews
  • Tech News
  • Tech Guide
  • Gadget & Apps

Magento Custom Module Development: How to Make Your First Module

Updated on Feb 14, 2020 by Guest Authors

Magento is an application that’s in the eCommerce realm and is one of the main reasons behind it is its Magento Developers Community. Magento community edition has all of the basic features to create an ecommerce store for small and large businesses.

But, what if you want to create an extension or custom module in Magento. What’re the basic steps you need to follow by the developer to make a good module, both the admin and the front end area?

Step by step, we’ll create our first module in Magento. First, install the application, turn the compilation and caching off and learn more about their file system. Now let’s get started to help you get started with magento custom module development.

Directory Structure

Before we started the Magento module development, here’s a bird’s eye view of Magento’s directory schedule:

  • Core [Contains code files]
  • Local [Obtains local modules]
  • App [Contains design, code pools, localization, Mage.php, and configuration files]
  • Webroot [magento root directory]
  • Design [Layout files and module templates]
  • xml
  • Install [Has installation files]

MVC Model

Like other popular PHP frameworks, Magento follows the MVC [Model View Controller pattern] framework for completing requests that come inwards. However, what segregates it from other frameworks is the request handling and the module configuration using the config xml and layout files.

Code Pools

Here, we’re going to make a HelloWorld module with a page on the front side, admin page, and menu; so let’s get started!

The first question that we need to know is where to place the files, directories, and modules. Here are the three choices

  1. The core directory
  2. The community directory
  3. The local directory

In Magento, all of these three directories are found under the app directory. Also, it’s called code pools in Magento.

Let’s view our code pools:

Core – The directory shows the core modules that are with the Magento community edition. We suggest that you don’t create direct changes in the files in the directory because once you upgrade Magento to a different version, the changes you create will disappear.

Community – The community pool has modules from developers that are installed manually or downloaded from the connect store. We recommend that you place modules in the directory if you’re trying to upload it to Magento connect store.

Local – We’ll put the projects’ modules in the local directory and make one if it’s not in the code directory.

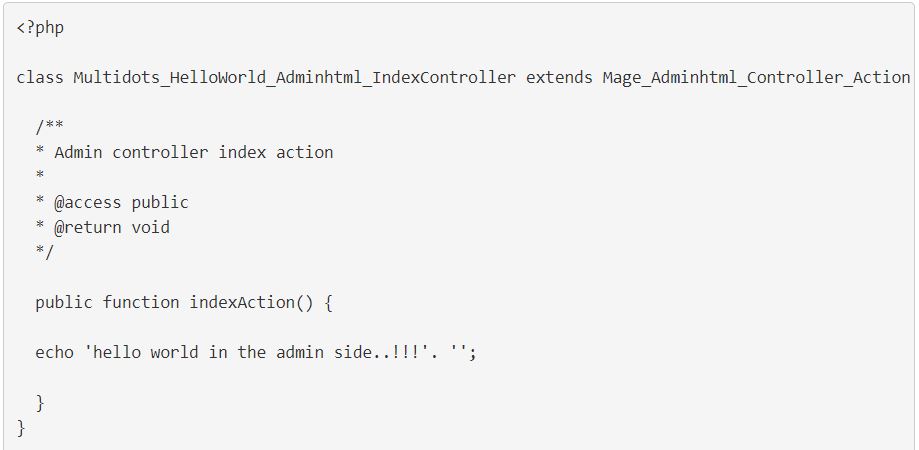
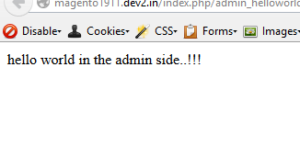
Here’s the code that you have to do to create a quick HTML module and the result.

Also, don’t be afraid to search around online for extra modules and such to learn more about the system. By doing so, you can learn how to use Magento more effectively and get better at making your e-commerce store more appealing to your customers.

Conclusion

To conclude, Magento custom module development requires some time and effort to get used to. But, it gives you the freedom to help make a responsive e-commerce store which can help showcase your products in a clear and attractive format. Ultimately, try it to see if it suits you and your overall project goals.

Disclosure: We might earn commission from qualifying purchases. The commission help keep the rest of my content free, so thank you!

Reader Interactions

Leave a Reply Cancel reply

Your email address will not be published. Required fields are marked *

Footer

New iDPRT Printers – SP450, SP420, and Zeva 1966 Photo Printer Reviewed

Munbyn P44S Wireless Thermal Label Printer Review

Master & Dynamic MW75 Wireless Headphones Review – Get Lost in the Music

3DMakerPro Mole 3D Scanner Review – Affordable, Portable, and Easy To Use

Follow TechWalls

YoutubeFacebookTwitterInstagram

Recent Posts

  • New iDPRT Printers – SP450, SP420, and Zeva 1966 Photo Printer Reviewed
  • Munbyn P44S Wireless Thermal Label Printer Review
  • POLYWOOD Classic Folding Adirondack vs Member’s Mark Adirondack Chair – Which Is Better?
  • BLUETTI’s New Expandable Outdoor Solar Generator AC60 & B80

Copyright © 2023 · All Rights Reserved

Manage Cookie Consent
We use technologies like cookies to store and/or access device information. We do this to improve browsing experience and to show personalized ads. Consenting to these technologies will allow us to process data such as browsing behavior or unique IDs on this site. Not consenting or withdrawing consent, may adversely affect certain features and functions.
Functional cookies Always active
The technical storage or access is strictly necessary for the legitimate purpose of enabling the use of a specific service explicitly requested by the subscriber or user, or for the sole purpose of carrying out the transmission of a communication over an electronic communications network.
Preferences
The technical storage or access is necessary for the legitimate purpose of storing preferences that are not requested by the subscriber or user.
Statistics
The technical storage or access that is used exclusively for statistical purposes. The technical storage or access that is used exclusively for anonymous statistical purposes. Without a subpoena, voluntary compliance on the part of your Internet Service Provider, or additional records from a third party, information stored or retrieved for this purpose alone cannot usually be used to identify you.
Marketing
The technical storage or access is required to create user profiles to send advertising, or to track the user on a website or across several websites for similar marketing purposes.
Manage options Manage services Manage vendors Read more about these purposes
View preferences
{title} {title} {title}