Those who want to learn Android programming with step by step method. This will help you to learn step by step button Android programming. Following some steps will help you create button in Android with Eclipse IDE.
Step 1
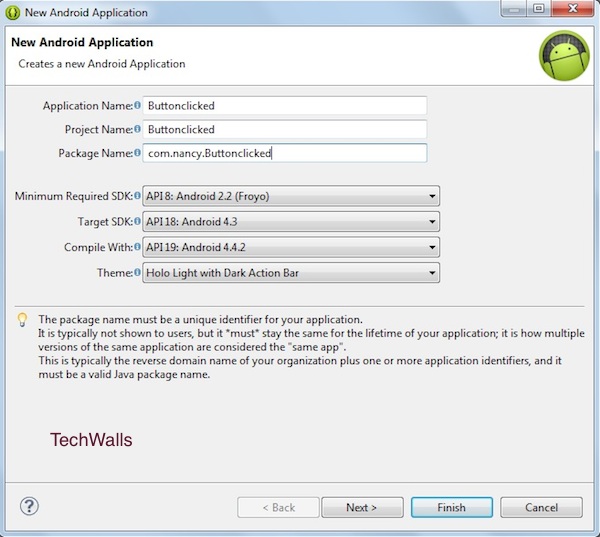
- Open eclipse, then go on the file menu, click on new ->Android application project to create the new project. When new application project gets opened then give the project name “Buttonclicked” & after giving project name give the package name “com.nancy.project” then click on next button. Click on finish button. Now your project is successfully created.
- You have two main activities, which are xml (activity_main.xml) & java class (MainActivity.java). Xml (Activity_main.xml) contains the information about the objects that we have use in the project & java class (MainActivity.java) contains the java source code. Xml window is located on the location resource (res)->project name->layout->activity_main.xml. Main activity window id located on the location project name -> src (source) -> package name -> main activity.java.
Step 2
- There are two types of layouts which we can select relative layout & linear layout we use the linear layout. To select the layout, click on graphical layout at the bottom of the window & then click on layouts & we double click on the linear layout (vertical), drag and drop this layout into the window. To use the buttons, click on form widgets->buttons and drag and drop the buttons into the window.
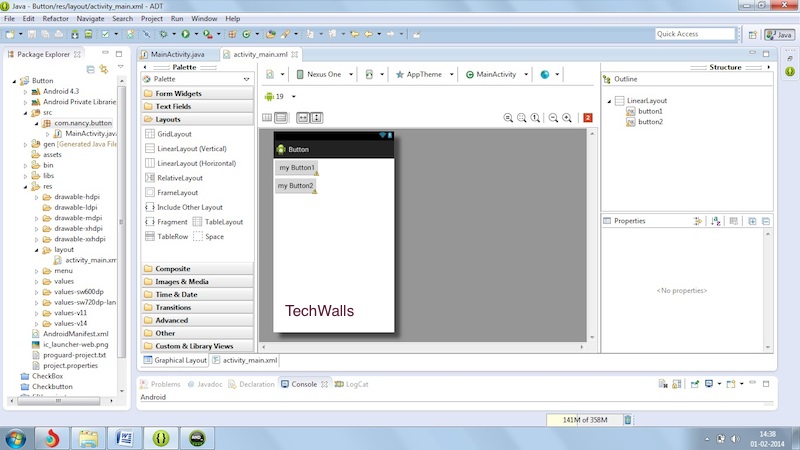
- As xml window contains all the content about the buttons like their id, name etc so here we can change their settings
<LinearLayout xmlns:android=“http://schemas.android.com/apk/res/android”
android:layout_width=“fill_parent”
android:layout_height=“fill_parent”
android:orientation=“vertical” >
<Button
android:id=“@+id/button1”
android:layout_width=“wrap_content”
android:layout_height=“wrap_content”
android:text=” my Button1″ />
<Button
android:id=“@+id/button2”
android:layout_width=“wrap_content”
android:layout_height=“wrap_content”
android:text=“my Button2” />
</LinearLayout>
- Here the user can also change the button id & the text of the button.
Step 3
- Now we have to go in the MainActivity.java class. Here first of all we have to take buttons that is (b1,b2) of button type & declare them above the oncreate function .
private Button b1,b2;
- Now pass the id to the buttons that we have used in the xml by findViewByid.
b1= (Button) findViewById(R.id.button1);
b2=(Button) findViewById(R.id.button2);
- Now you have to set the on click listener on the button (b1,b2).
package com.nancy.button;
import android.os.Bundle;
import android.app.Activity;
import android.view.Menu;
import android.view.View;
import android.view.View.OnClickListener;
import android.widget.Button;
import android.widget.Toast;
public class MainActivity extends Activity implements OnClickListener{
private Button b1,b2;
@Override
protected void onCreate(Bundle savedInstanceState) {
super.onCreate(savedInstanceState);
setContentView(R.layout.activity_main);
b1= (Button) findViewById(R.id.button1);
b2=(Button) findViewById(R.id.button2);
b1.setOnClickListener(new OnClickListener() {
@Override
public void onClick(View arg0) {
// TODO Auto-generated method stub
Toast msg =Toast.makeText(getBaseContext(), “you have clicked button 1”, Toast.LENGTH_SHORT);
msg.show();
}
});
b2.setOnClickListener(new OnClickListener() {
@Override
public void onClick(View arg0) {
// TODO Auto-generated method stub
Toast msg =Toast.makeText(getBaseContext(), “you have clicked button 2”, Toast.LENGTH_SHORT);
msg.show();
}
});
}
@Override
public void onClick(View arg0) {
// TODO Auto-generated method stub
}
}
- Now give the toast message in the button. We can display the toast message either for short time or for long time.
Toast msg =Toast.makeText(getBaseContext(), “you have clicked button 1”, Toast.LENGTH_SHORT);
msg.show();
Step 4
- Now pass the listener to the button (b1,b2) in the xml class. Now I create OnCreateListerner when the user press it.
android:onClick=“setOnClickListener”
- Now you can see the result on Android Virtual Device (AVD). It is also called Emulator.
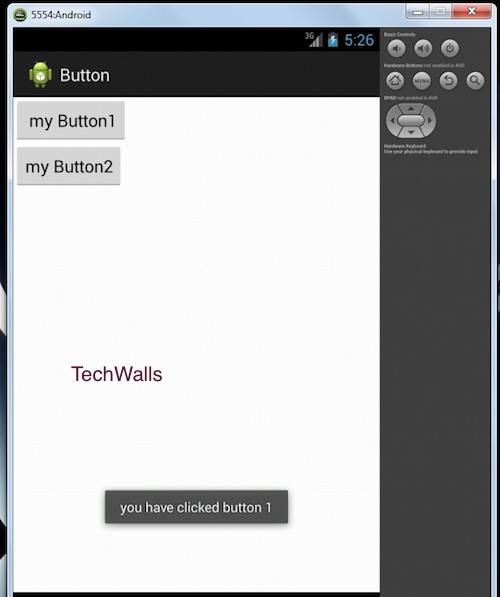
- Now you have successfully created buttons in android application.
Hopefully this information is useful to you.
Thank you.